VM Exclusive from Each Other (Soft)

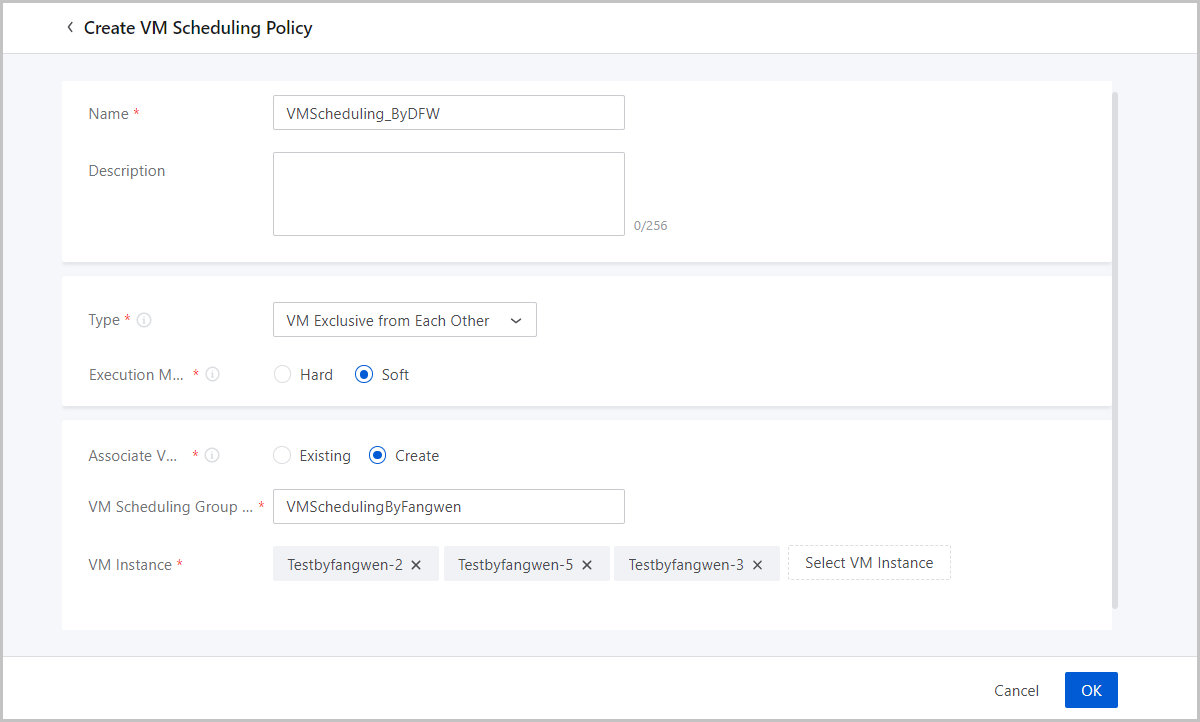
In this practice, you will learn how to use a VM Exclusive from Each Other (Soft) scheduling policy.

Assume that in a zone, a user intends to deploy three business VM instances and prefers these VM instances run separately on three different hosts as much as possible.

To run this practice, follow these steps:
  1. Create three business VM instances.
  2. Create a VM Exclusive from Each Other (Soft) scheduling policy.
  3. Check whether the three business VM instances are deployed on different hosts when conditions allow.
  1. Create three business VM instances.

    On the main menu of ZStack Cloud, choose Resource Center > Resource Pool > Virtual Resource > VM Instance. Then, the VM Instance page is displayed, and you can then batch create three VM instances by fast creation. For more information, see Create a VM Instance (Fast Creation).

  2. Create a VM Exclusive from Each Other (Soft) scheduling policy.

    On the main menu of ZStack Cloud, choose Resource Center > Resource Pool > Resource Service > VM Scheduling Policy. Then, the VM Scheduling Policy page is displayed. Click Create VM Scheduling Policy and the Create VM Scheduling Policy page is displayed.

    On the displayed page, set the following parameters:
    • Name: Enter a name for the VM scheduling policy.
    • Description: Optional. Enter a description for the VM scheduling policy.
    • Type: Select VM Exclusive from Each Other.
    • Execution Mechanism: Supports the mechanisms of Hard and Soft. Here we choose Soft.
      • Hard: VM instances are forcibly assigned to hosts based on the VM Exclusive from Each Other policy. VM instances in the same VM scheduling group must not run on the same host. If no host is available to be scheduled based on the policy for a VM instance, the VM instance will end up failure upon startup.
      • Soft: VM instances are primarily assigned to hosts based on the VM Exclusive from Each Other policy. If possible, VM instances in the same VM scheduling group should not run on the same host. If no host is available to be scheduled based on the policy for a VM instance, the VM instance will attempt to run on a host that does not satisfy the policy while has sufficient resources.
    • Associate VM Scheduling Group: You can associate a VM scheduling policy with a new or existing VM scheduling group. After the association, the policy takes effect on all VM instances in the scheduling group. Here we create a new scheduling group and associate it with the three VM instances created on step1.
      • Existing: Associate the VM scheduling policy with an existing VM scheduling group.
        • VM Scheduling Group: Select an existing VM scheduling group.
      • Create: Create a new VM scheduling group.
        • VM Scheduling Group Name: Enter a name for the VM scheduling group.
        • VM Instance: Select one or more VM instances to add to the scheduling group. Here we add the preceding three VM instances to the scheduling group.
    Figure 1. Create VM Exclusive from Each Other (Soft)


  3. Check whether the three business VM instances are deployed on different hosts when conditions allow.

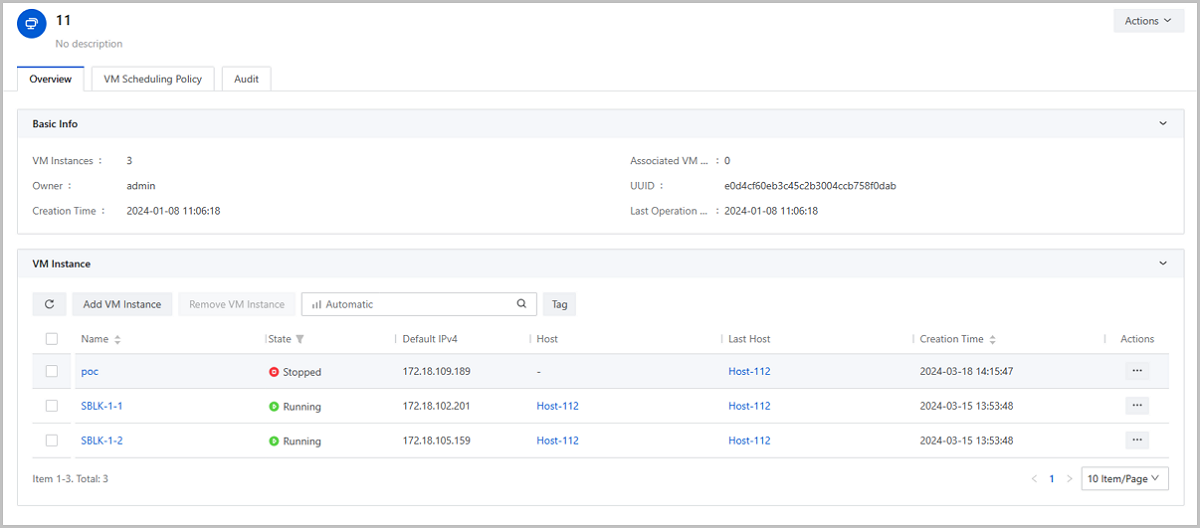
    On the Overview tab of the VM scheduling group, you can see that the three business VM instances are deployed on three different hosts. This means the VM Exclusive from Each Other (Soft) scheduling policy takes effect.

    Figure 2. Verify Effectiveness of VM Exclusive from Each Other (Soft)


VM Exclusive from Each Other (Hard)

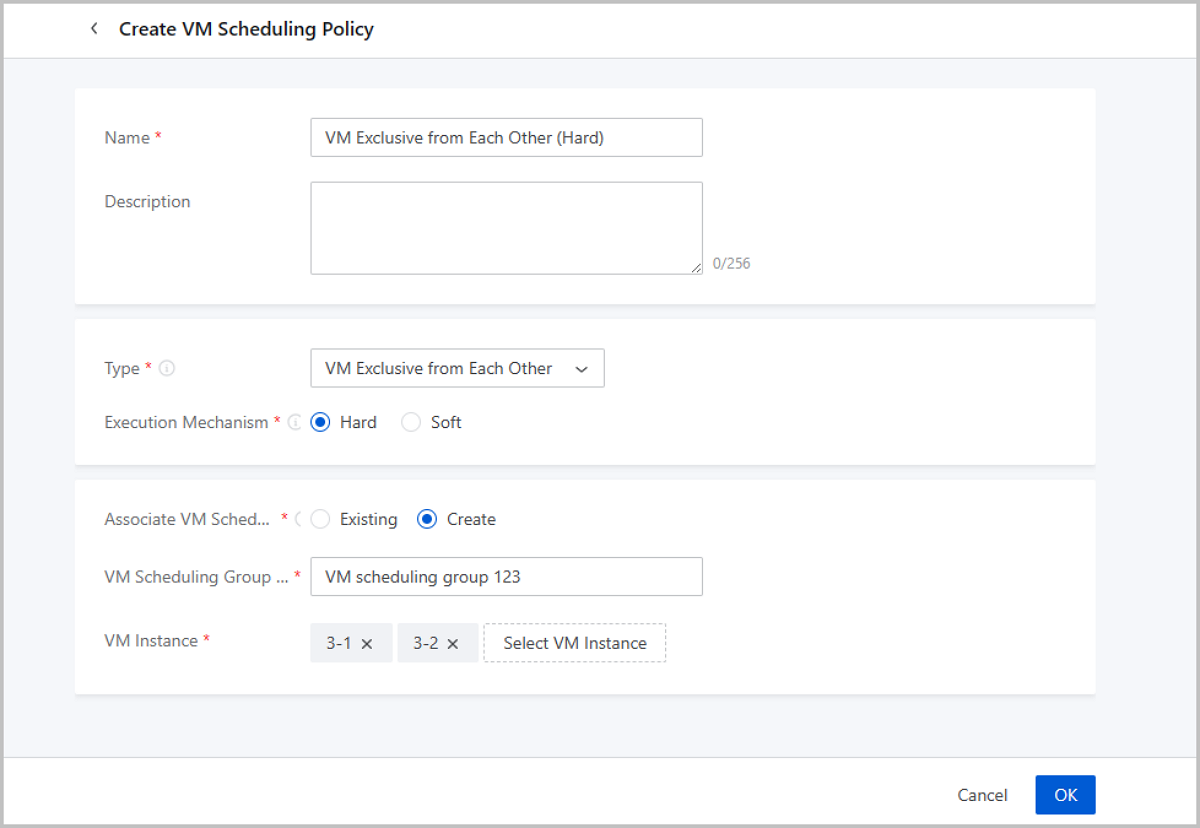
In this practice, you will learn how to use a VM Exclusive from Each Other (Hard) scheduling policy.

Assume that in a zone, a user intends to deploy three business VM instances and prefers these VM instances are forcibly assigned to three different hosts.

To run this practice, follow these steps:
  1. Create three business VM instances.
  2. Create a VM Exclusive from Each Other (Hard) scheduling policy.
  3. Check whether the three business VM instances are forcibly deployed on three different hosts.
  1. Create three business VM instances.

    On the main menu of ZStack Cloud, choose Resource Center > Resource Pool > Virtual Resource > VM Instance. Then, the VM Instance page is displayed, and you can batch create three VM instances by fast creation. For more information, see Create a VM Instance (Fast Creation).

  2. Create a VM Exclusive from Each Other (Hard) scheduling policy.

    On the main menu of ZStack Cloud, choose Resource Center > Resource Pool > Resource Service > VM Scheduling Policy. Then, the VM Scheduling Policy page is displayed. Click Create VM Scheduling Policy, and then the Create VM Scheduling Policy page is displayed.

    On the displayed page, set the following parameters:
    • Name: Enter a name for the VM scheduling policy.
    • Description: Optional. Enter a description for the VM scheduling policy.
    • Type: Select VM Exclusive from Each Other.
    • Execution Mechanism: Supports the mechanisms of Hard and Soft. Here we choose Hard.
      • Hard: VM instances are forcibly assigned to hosts based on the VM Exclusive from Each Other policy. VM instances in the same VM scheduling group must not run on the same host. If no host is available to be scheduled based on the policy for a VM instance, the VM instance will end up failure upon startup.
      • Soft: VM instances are primarily assigned to hosts based on the VM Exclusive from Each Other policy. If possible, VM instances in the same VM scheduling group should not run on the same host. If no host is available to be scheduled based on the policy for a VM instance, the VM instance will attempt to run on a host that does not satisfy the policy while has sufficient resources.
    • Associate VM Scheduling Group: You can associate a VM scheduling policy with a new or existing VM scheduling group. After the association, the policy takes effect on all VM instances in the scheduling group. Here we create a new scheduling group and associate it with VM instances.
      • Existing: Associate the VM scheduling policy with an existing VM scheduling group.
        • VM Scheduling Group: Select an existing VM scheduling group.
      • Create: Create a new VM scheduling group.
        • VM Scheduling Group Name: Enter a name for the VM scheduling group.
        • VM Instance: Select one or more VM instances to add to the scheduling group. Here we add the preceding three VM instances to the scheduling group.
    Figure 1. Create VM Exclusive from Each Other (Hard)


  3. Check whether the three business VM instances are forcibly deployed on three different hosts.

    On the Overview tab of the VM scheduling group, you can see that the three VM instances are forcibly deployed on three different hosts. This means the VM Exclusive from Each Other (Hard) scheduling policy takes effect.

    Figure 2. Verify Effectiveness of VM Exclusive from Each Other (Hard)


VMs Affinitive to Hosts (Soft)

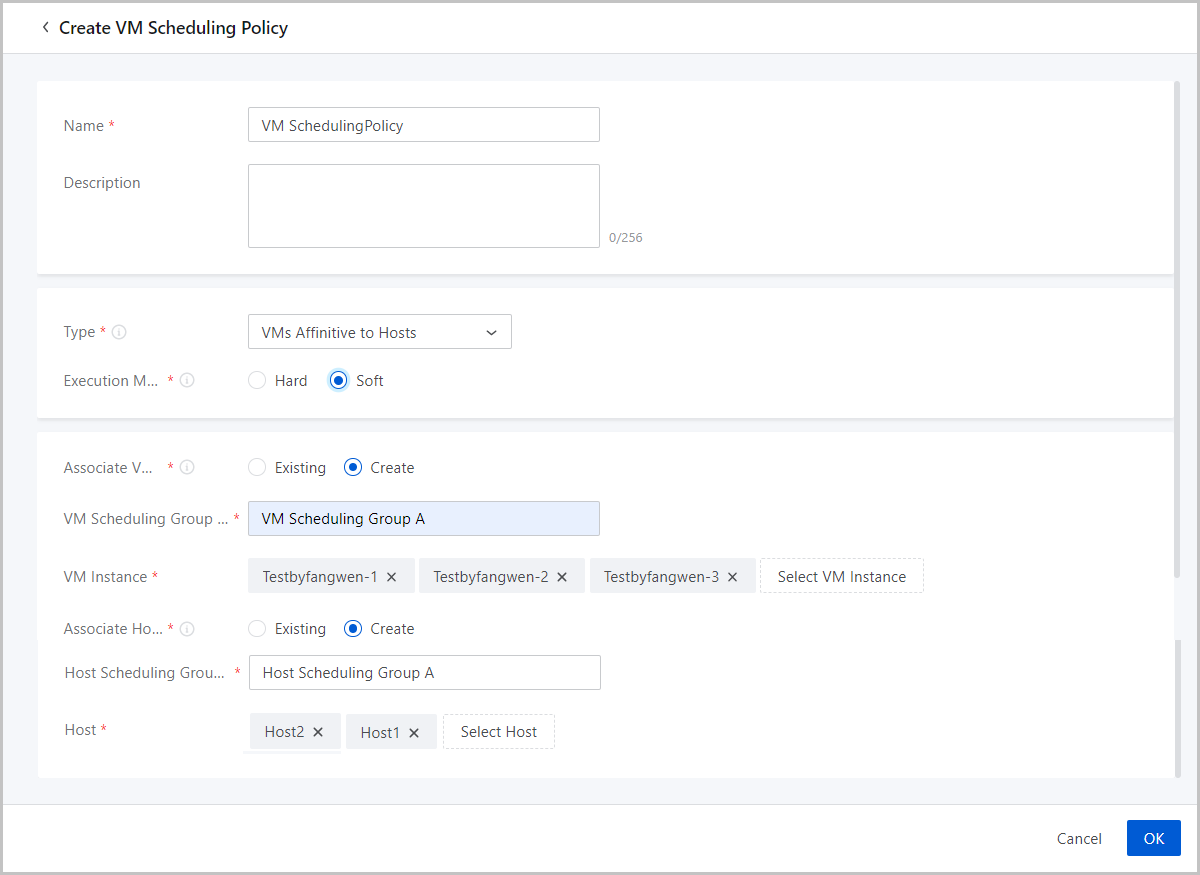
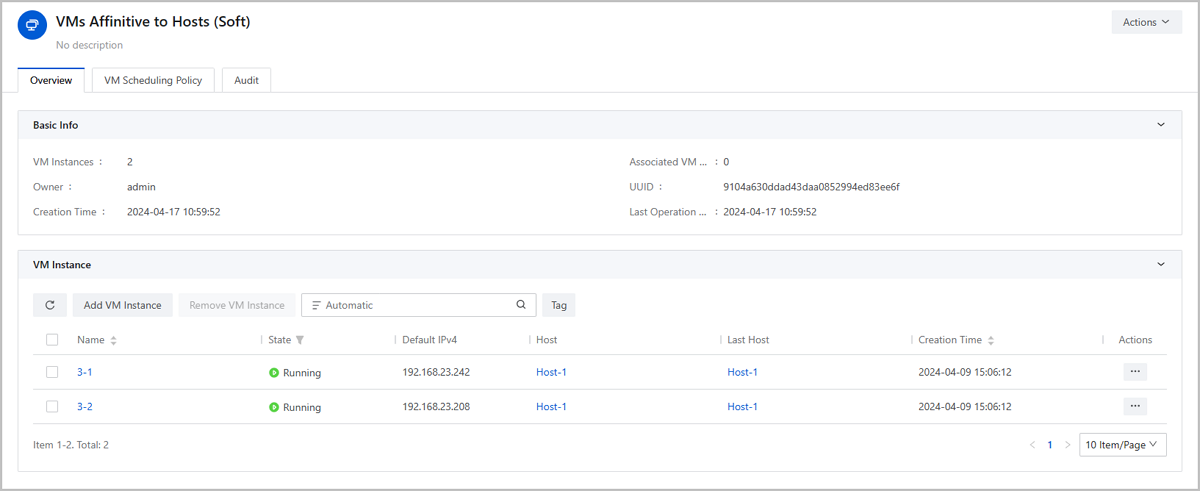
In this practice, you will learn how to use a VMs Affinitive to Hosts (Soft) scheduling policy.

Assume that in a zone, a user intends to deploy three business VM instances and prefers these VM instances are deployed on the specified Host1 and Host2 as much as possible.

To run this practice, follow these steps:
  1. Create three business VM instances.
  2. Create a VMs Affinitive to Hosts (Soft) scheduling policy.
  3. Check whether the three business VM instances are deployed on the specified two hosts.
  1. Create three business VM instances.

    On the main menu of ZStack Cloud, choose Resource Center > Resource Pool > Virtual Resource > VM Instance. Then, the VM Instance page is displayed, and you can batch create three VM instances by fast creation. For more information, see Create a VM Instance (Fast Creation).

  2. Create a VMs Affinitive to Hosts (Soft) scheduling policy.

    On the main menu of ZStack Cloud, choose Resource Center > Resource Pool > Resource Service > VM Scheduling Policy. Then, the VM Scheduling Policy page is displayed. Click Create VM Scheduling Policy, and then the Create VM Scheduling Policy page is displayed.

    On the displayed page, set the following parameters:
    • Name: Enter a name for the VM scheduling policy.
    • Description: Optional. Enter a description for the VM scheduling policy.
    • Type: Select VMs Affinitive to Hosts.
    • Execution Mechanism: Supports the mechanisms of Hard and Soft. Here we choose Soft.
      • Hard: VM instances are forcibly assigned to hosts based on the VM Exclusive from Each Other policy. VM instances in the same VM scheduling group must not run on the same host. If no host is available to be scheduled based on the policy for a VM instance, the VM instance will end up failure upon startup.
      • Soft: VM instances are primarily assigned to hosts based on the VM Exclusive from Each Other policy. If possible, VM instances in the same VM scheduling group should not run on the same host. If no host is available to be scheduled based on the policy for a VM instance, the VM instance will attempt to run on a host that does not satisfy the policy while has sufficient resources.
    • Associate VM Scheduling Group: You can associate a VM scheduling policy with a new or existing VM scheduling group. After the association, the policy takes effect on all VM instances in the scheduling group. Here we create a new scheduling group and associate it with VM instances.
      • Existing: Associate VMs with a existing VM scheduling group.
        • VM Scheduling Group: Choose a existing VM scheduling group.
      • Create: Create a new VM scheduling group.
        • VM Scheduling Group Name: Set the name of the VM scheduling group.
        • VM Instance: Add one or more VM instances to this scheduling group. Here we add the preceding three VM instances.
    • Associate Host Scheduling Group: You can associate a VM scheduling policy with a new or existing host scheduling groups. Here we choose to create a new host scheduling group. After the association, the policy takes effect on all hosts in the scheduling group.
      • Existing: Associate a VM scheduling policy with a existing host scheduling group.
        • Host Scheduling Group: Choose an existing host scheduling group.
      • Create: Create a new host scheduling group.
        • Name: Enter a name for the host scheduling group.
        • Host: Add one or more hosts to this scheduling group. Here we add Host1 and Host2.
    Figure 1. Create VMs Affinitive to Hosts (Soft)


  3. Check whether the three business VM instances are deployed on the specified two hosts.

    On the Overview tab of the VM scheduling group, you can see that the three VM instances are deployed on Host1 and Host2. This means the VMs Affinitive to Hosts (Soft) scheduling policy takes effect.

    Figure 2. Verify Effectiveness of VMs Affinitive to Hosts (Soft)


more PDFs

Download Link for All Versions

Download

Already filled the basic info? Click here.

Enter at least 2 characters.
Invalid mobile number.
Enter at least 4 characters.
Invalid email address.
Wrong code. Try again. Send Code Resend Code (60s)

An email with a verification code will be sent to you. Make sure the address you provided is valid and correct.

Download

Not filled the basic info yet? Click here.

Invalid email address or mobile number.
同意 不同意

I have read and concur with the Site TermsPrivacy PolicyRules and Conventions on User Management of ZStack Cloud

Email Us

contact@zstack.io
ZStack certification training consulting
Enter at least 2 characters.
Invalid mobile number.
Enter at least 4 characters.
Invalid email address.
Wrong code. Try again. Send Code Resend Code (60s)

Email Us

contact@zstack.io

The download link is sent to your email address.

If you don't see it, check your spam folder, subscription folder, or AD folder. After receiving the email, click the URL to download the documentation.

The download link is sent to your email address.

If you don't see it, check your spam folder, subscription folder, or AD folder.
Or click on the URL below. (For Internet Explorer, right-click the URL and save it.)

Thank you for using ZStack products and services.

Submit successfully.

We'll connect soon.

Thank you for choosing ZStack products and services.

Back to Top